
Once you’ve downloaded and installed BIND the next step is to configure it for your environment. There are three types of configuration:
- A caching-only nameserver
- An authoritative nameserver
- A caching and authoritative nameserver
This section of the guide is for a caching-only nameserver. Click on the respective links above if you want to review the configuration steps for one of the other two types.
If you don’t need to read the guide and you just want my basic conf files then here they are: named.conf, named.conf.options, named.conf.local, named.conf.logging
Please note the following important assumptions:
- BIND installation folder: C:\BIND
- BIND Service Account name: named
Step 1: Getting the latest root hints
BIND needs to know the IP address of the DNS root nameservers – that’s where all the magic starts. Whenever BIND is asked to resolve a record that it doesn’t have in its cache it will start by querying one of the root nameservers and then work down from there. No root nameservers means no DNS queries, period!
Make sure you’ve added your BIND installation folder to your Path (see the Installation Guide) then drop to a Command Prompt and run the following:
C:\Users\ServerAdmin> cd C:\BIND
C:\BIND\> md zones
C:\BIND\> cd zones
C:\BIND\zones> dig NS . @m.root-servers.net > db.root.hint.zone
If all goes well you should now see a file called db.root.hint.zone in the new C:\BIND\zones subfolder. This is just a plain text file so you can take a look at it in Notepad++.
Step 2: Create a basic named.conf file
If this is the first time you’ve used BIND, whether on Windows or Linux, please take a look at this short guide which explains the purpose of the four BIND configuration files.
My named.conf file looks like this. As you can see it simply references other configuration files, all of which are stored in c:\bind\etc.
// This is the primary configuration file for the BIND DNS server named.
//
// If you are just adding zones, please do that in named.conf.local

include "c:\bind\etc\named.conf.options";
include "c:\bind\etc\named.conf.local";
include "c:\bind\etc\named.conf.logging";
Click here to download a copy of my named.conf file. Alternatively copy and paste the above text into a new file called C:\BIND\etc\named.conf. Make sure you’ve called it named.conf and not named.conf.txt. If you’re not sure then change your File Explorer options and untick Hide extensions for known file types.
Step 3: Create a basic named.conf.options file
The named.conf.options file contains all the configuration settings related to your BIND installation with the exception of logging (because we’ve told named that we’re using a separate file to configure logging). Click here to download a copy of my basic named.conf.options file. It’s heavily commented so you can see exactly what each option is doing. If you’re running BIND on your LAN and you want it to resolve IP addresses for internal hosts (192.168.x.y etc) then make sure to delete the relevant line from the blackhole section.
Step 4: Create a basic named.conf.local file
The named.conf.local file contains zone file information – information about the DNS zones (domain names) for which this BIND server is authoritative. In a caching-only configuration we are not responsible for any zones so this file only contains a link to the root hints file we created earlier. Click here to download a copy of my named.conf.local file which looks like this:
zone "." IN {
     type hint;
     file "db.root.hint.zone";
         # this tells BIND how to find the root nameservers
};
Step 5: Create a basic named.conf.logging file
The named.conf.logging file tells BIND how we want it to log all activity. Rather than log to a single large unmanageable file we choose to split out the different types of events into different files. This means that if we simply want to take a look at all of the queries received by our nameserver then we can do so – and our logfile won’t be interspersed with other events.
Click here to download a copy of my named.conf.logging file. This is a long text file because it’s structured and well-commented. I can’t take all the credit for this, it’s a slightly modified version of the one available here: https://kb.isc.org/docs/aa-01526
Essentially it tells BIND that we want multiple log files for different types of events. So query logs (one of the logs you’ll review most often) are stored in C:\BIND\logs\queries.log whilst any rate limiting activity is recorded in C:\BIND\logs\rate_limiting.log.
Thus it’s important to now create the C:\BIND\logs folder otherwise you’ll get an error when trying to start the ISC BIND service (because named can’t create files in folders that don’t exist):
C:\Users\ServerAdmin> cd C:\BIND
C:\BIND\> md logs
BIND will also log significant startup events to the Windows Application Event log by default.
Important: Tools available on the WinBIND site assume that logging has been setup similarly to that which is described here.
Step 6: Generating the RNDC key
There’s one more thing we need to do before starting BIND for the first time: we have to generate an RNDC keyfile. This file is used whenever you’re performing BIND operations from the command line or when you’re remotely communicating with the named service from another device (eg authoritatively updating DNS records in a zone file). Make sure you’ve added your BIND installation folder to your Path (see the Installation Guide) then drop to a Command Prompt and run the following:
C:\Users\ServerAdmin> cd C:\BIND\etc
C:\BIND\etc>
rndc-confgen -a
If all goes well you should see the following, along with a new file in your previously empty etc subfolder:
wrote key file "C:\BIND\etc\rndc.key"Step 7: Starting BIND for the first time
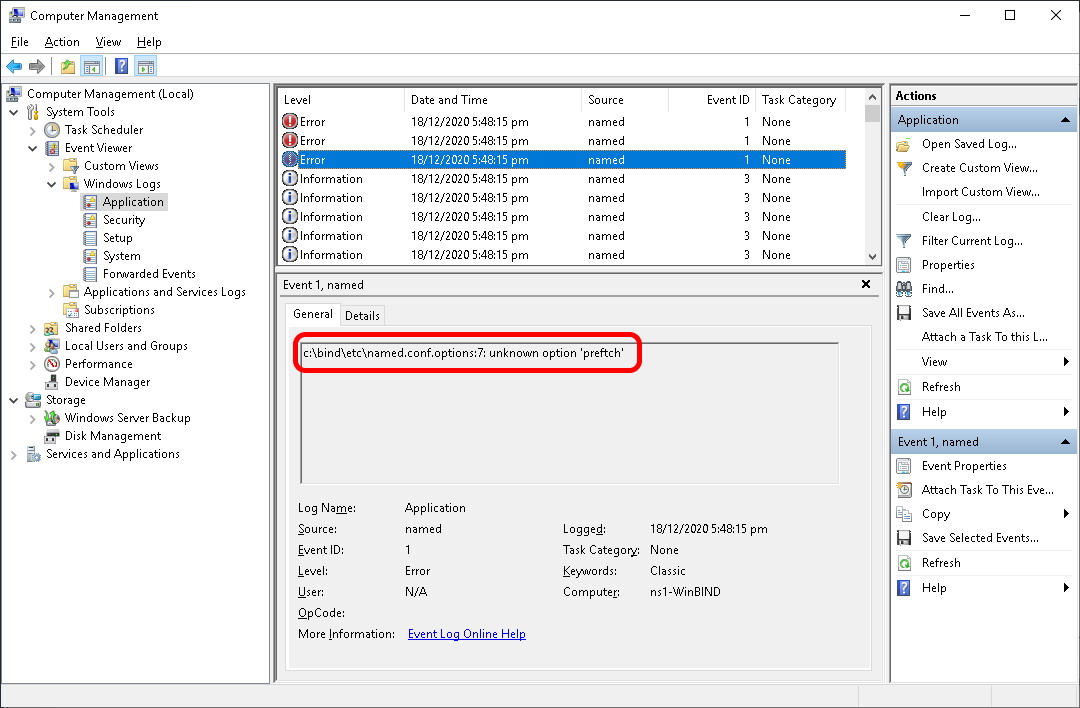
That’s it! Our basic configuration is now done. Head to Services, find the ISC BIND service, cross your fingers and click Start. You should see the Status change to Running. If not then head to the Event Viewer > Windows Logs > Application and filter by the Event source “named” to see what the problem was. Quite often it’s a typo in a configuration file. BIND will tell you which one, along with the line number. Here BIND is telling me that I’ve misspelt “prefetch” on line 7 in my named.conf.options file (click the image to see it more clearly):
If the Status has changed to Running then you’re done, BIND is running – well done!
Let’s test it shall we?