
This page will guide you through installing BIND on Windows for the first time. If you’re upgrading from one version to another (eg from 9.16.7 to 9.16.9) then please read the Upgrade guide instead.
Step 1: Install Microsoft Windows Server
This guide assumes you have a working installation of Microsoft Windows Server. The instructions and screenshots have been taken using Windows Server 2019 Standard Edition with a GUI, but other versions should be similar.
The installation of Windows Server is not covered here, but suffice to say a vanilla Windows Server installation is fine. There’s no need to add any roles or features, and BIND’s installation process will take care of any dependencies such as the Visual C++ Runtime library.
Make sure your Windows Server is fully patched and up-to-date then move on to Step 2.
Step 2: Downloading BIND for Windows
Download the latest version of BIND for Windows from here: https://www.isc.org/download/
Scroll down the page and click on BIND 9. Then click the blue Download button next to the most recent Current-Stable version. You’ll get a pop-up window and one of the options will be BIND9.{version-number}.zip – win 64-bit. That’s the one you want. You will almost always want the version that’s marked as Current-Stable. I don’t recommend running the Development version on a production server.
I strongly recommend using a tool like WinMD5 to verify the signature of the file you downloaded. That way you can be sure that you’ve got the genuine article and your download hasn’t been intercepted.
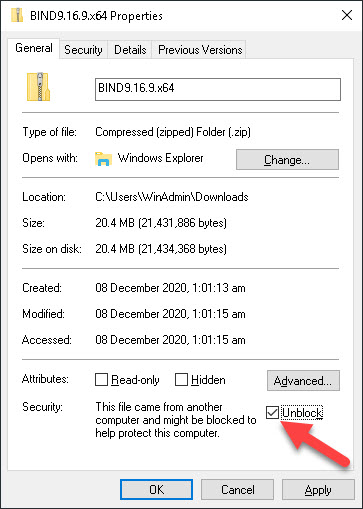
Once you’ve downloaded the zip file you need to unblock it. If you don’t do this then Windows won’t allow the executable to run, and that will cause all sorts of unexpected errors when you try to install and run BIND. Find the downloaded file, right-click on it and choose Properties, then tick the Unblock checkbox as shown below, and finally click on OK.
Once you’ve done this you can then right-click the downloaded zip file to extract it as normal. Just extract it to a temporary folder for now, the installation routine will create the folder into which BIND will actually be installed.
Step 3: Installing BIND for the first time
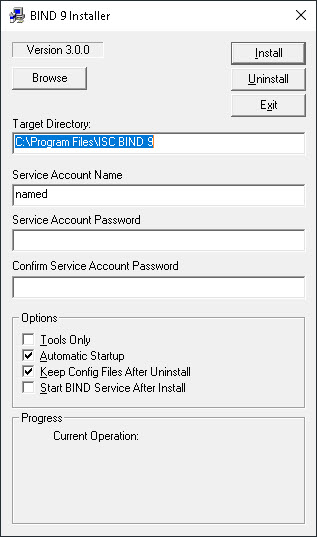
Now you’re ready to actually install BIND. Launch BINDInstall.exe from the folder into which you extracted the zip file. You’ll see the following installation configuration applet:
Be aware that if you’re logged-on using an account other than the built-in local Administrator account the installation applet may not be able to create the User Account you want to use for the ISC BIND service. Even if your user account is a member of the local Administrators group, and even if you right-click and Run as Administrator it still won’t work. So you may want to do this next part whilst logged-on as the built-in local Administrator account.
Set the Target Directory to wherever you’d like to install BIND. There’s no Browse… button so you’ll just need to overwrite it if you’re not happy with the suggested default. The folder doesn’t need to exist already, the installation routine will create it if necessary.
Please note that the rest of the guide assumes an installation folder of C:\BIND. That makes it a lot easier when it comes to specifying the path in any configuration files, or when running tools from the command line.
Next decide what you’d like to use as the Service Account Name. This is the user account under which the ISC BIND service will run. Do not enter Administrator here! That would be a terrible idea since it means that if someone manages to exploit your BIND instance they will have full control over your Windows Server. Choose a unique username for the service, along with a suitably secure password. Just like with the Target Directory the username doesn’t need to exist already. The installation applet will create the user account with the specified password and grant it appropriate Logon as a Service rights.
Keep Automatic Startup ticked (so the ISC BIND service starts automatically whenever the server starts) and I also recommend keeping Keep Config Files After Uninstall ticked. If you ever have to uninstall/reinstall BIND for any reason then this ensures that your config files aren’t touched.
I recommend leaving Start BIND Service After Install unticked because we need to first need to update our configuration files so that BIND knows what it’s doing!
Click on Install and the installation applet will start the installation process.
If you don’t have the Microsoft Visual C++ 2017 Runtime installed (and why would you?!) then the installation routine will install this for you.
If all goes well then you’ll get a success message accordingly:
If you switched to using the built-in Administrator account then you can now log off and log back on as your normal user account.
Step 4: Allow BIND through your firewall
BIND listens on both UDP port 53 and TCP port 53 by default. It’s a common misconception that DNS queries and responses occur only over UDP. That’s incorrect. Any DNS query or response exceeding 512 bytes is sent over TCP. That includes a lot of DNS TXT record responses (especially SPF records). And of course both DNS over HTTPS and DNSSEC are conducted exclusively over TCP (the former using TCP port 443 of course).
So make sure you allow inbound connections on both UDP and TCP 53, and that you allow BIND/named to make outbound connections using any port.
Infoblox has an excellent article discussing BIND’s use of UDP and TCP here.
Step 5: Add BIND to your path
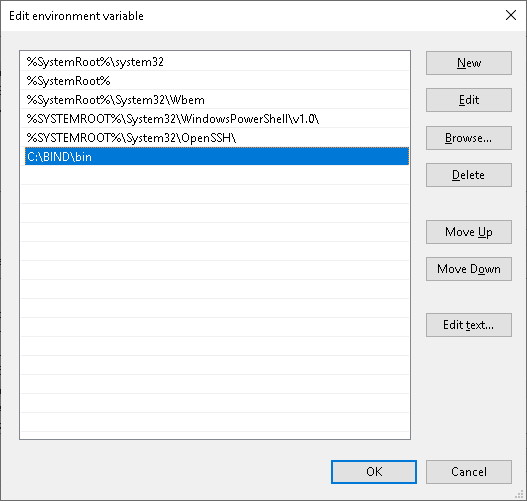
There’ll be some elements of BIND that you’ll want to control from the command line so it makes it much easier if you add your BIND installation to your PATH environment variable. The BIND command line utilities are all stored in the bin subfolder of the installation folder.
- Right-click on This PC and select Properties
- Click on Advanced system settings and then Environment Variables…
- Click on Path in the bottom window then Edit…
- Click on Browse… and navigate to the bin subfolder of the installation folder, then OK
- Click OK, OK, OK
Step 6: Setting the correct filesystem permissions
We need to grant the Service Account Modify and Write permissions on the BIND installation folder. Otherwise the BIND service won’t be able to write log files, update configuration files (eg Dynamic DNS updates), or maintain its own cache.
- Right-click on the BIND installation folder, go to Properties > Security > Edit…
- Click on Add…
- Type the name of the Service Account you specified during installation
- Click on Check Names (to make sure the account is recognised) then click on OK
- Tick the Allow box for both Modify and Write
- Full control is not required (and, for security purposes, should not be granted)
- Click on OK, then click on OK again
Step 7: Configuring BIND
The path you take here will depend on whether you’re setting-up a caching-only name server (eg you’re using this server to provide DNS resolution to clients inside your LAN) or whether you’re using this server to be authoritative for one or more domain names (“zones” in DNS-speak). Take a look at one of the following guides depending upon your intended use:
- A caching-only nameserver
- An authoritative nameserver
- A caching and authoritative nameserver